Baking bread is both an art and a science, with its own unique language. Understanding the terminology, from techniques like autolyse and folding to concepts like hydration and proofing, can make the difference between a dense loaf and a light, airy masterpiece.
Terms alphabetically
Autolyse
Resting dough (flour + water only) for 20–60 minutes before adding yeast/salt. Reduces kneading time and improves gluten structure.
Bâtard
Oval-shaped loaf, typically 20-30 cm long. Shape by flattening a boule and rolling it tightly into an oval.
Bâtard
Oval-shaped loaf, typically 20-30 cm long. Shape by flattening a boule and rolling it tightly into an oval.
Biga
Italian pre-ferment (50–60% hydration, 0.1–0.3% yeast). Ferment 12–24 hours at room temp. Use for chewy, flavorful bread like ciabatta.
Blowouts
Cracks in the crust caused by uneven gas release or overproofing. Fix: Score dough deeply (1,3 cm) and proof properly.
Boule
Round loaf, shaped by pulling dough edges toward the center and pinching to seal. Ideal for sourdough or rustic bread.
Bulk Fermentation
First rise after mixing (1–4 hours at room temp or overnight in the fridge). Monitor dough volume (50–100% increase) rather than time.
Crumb
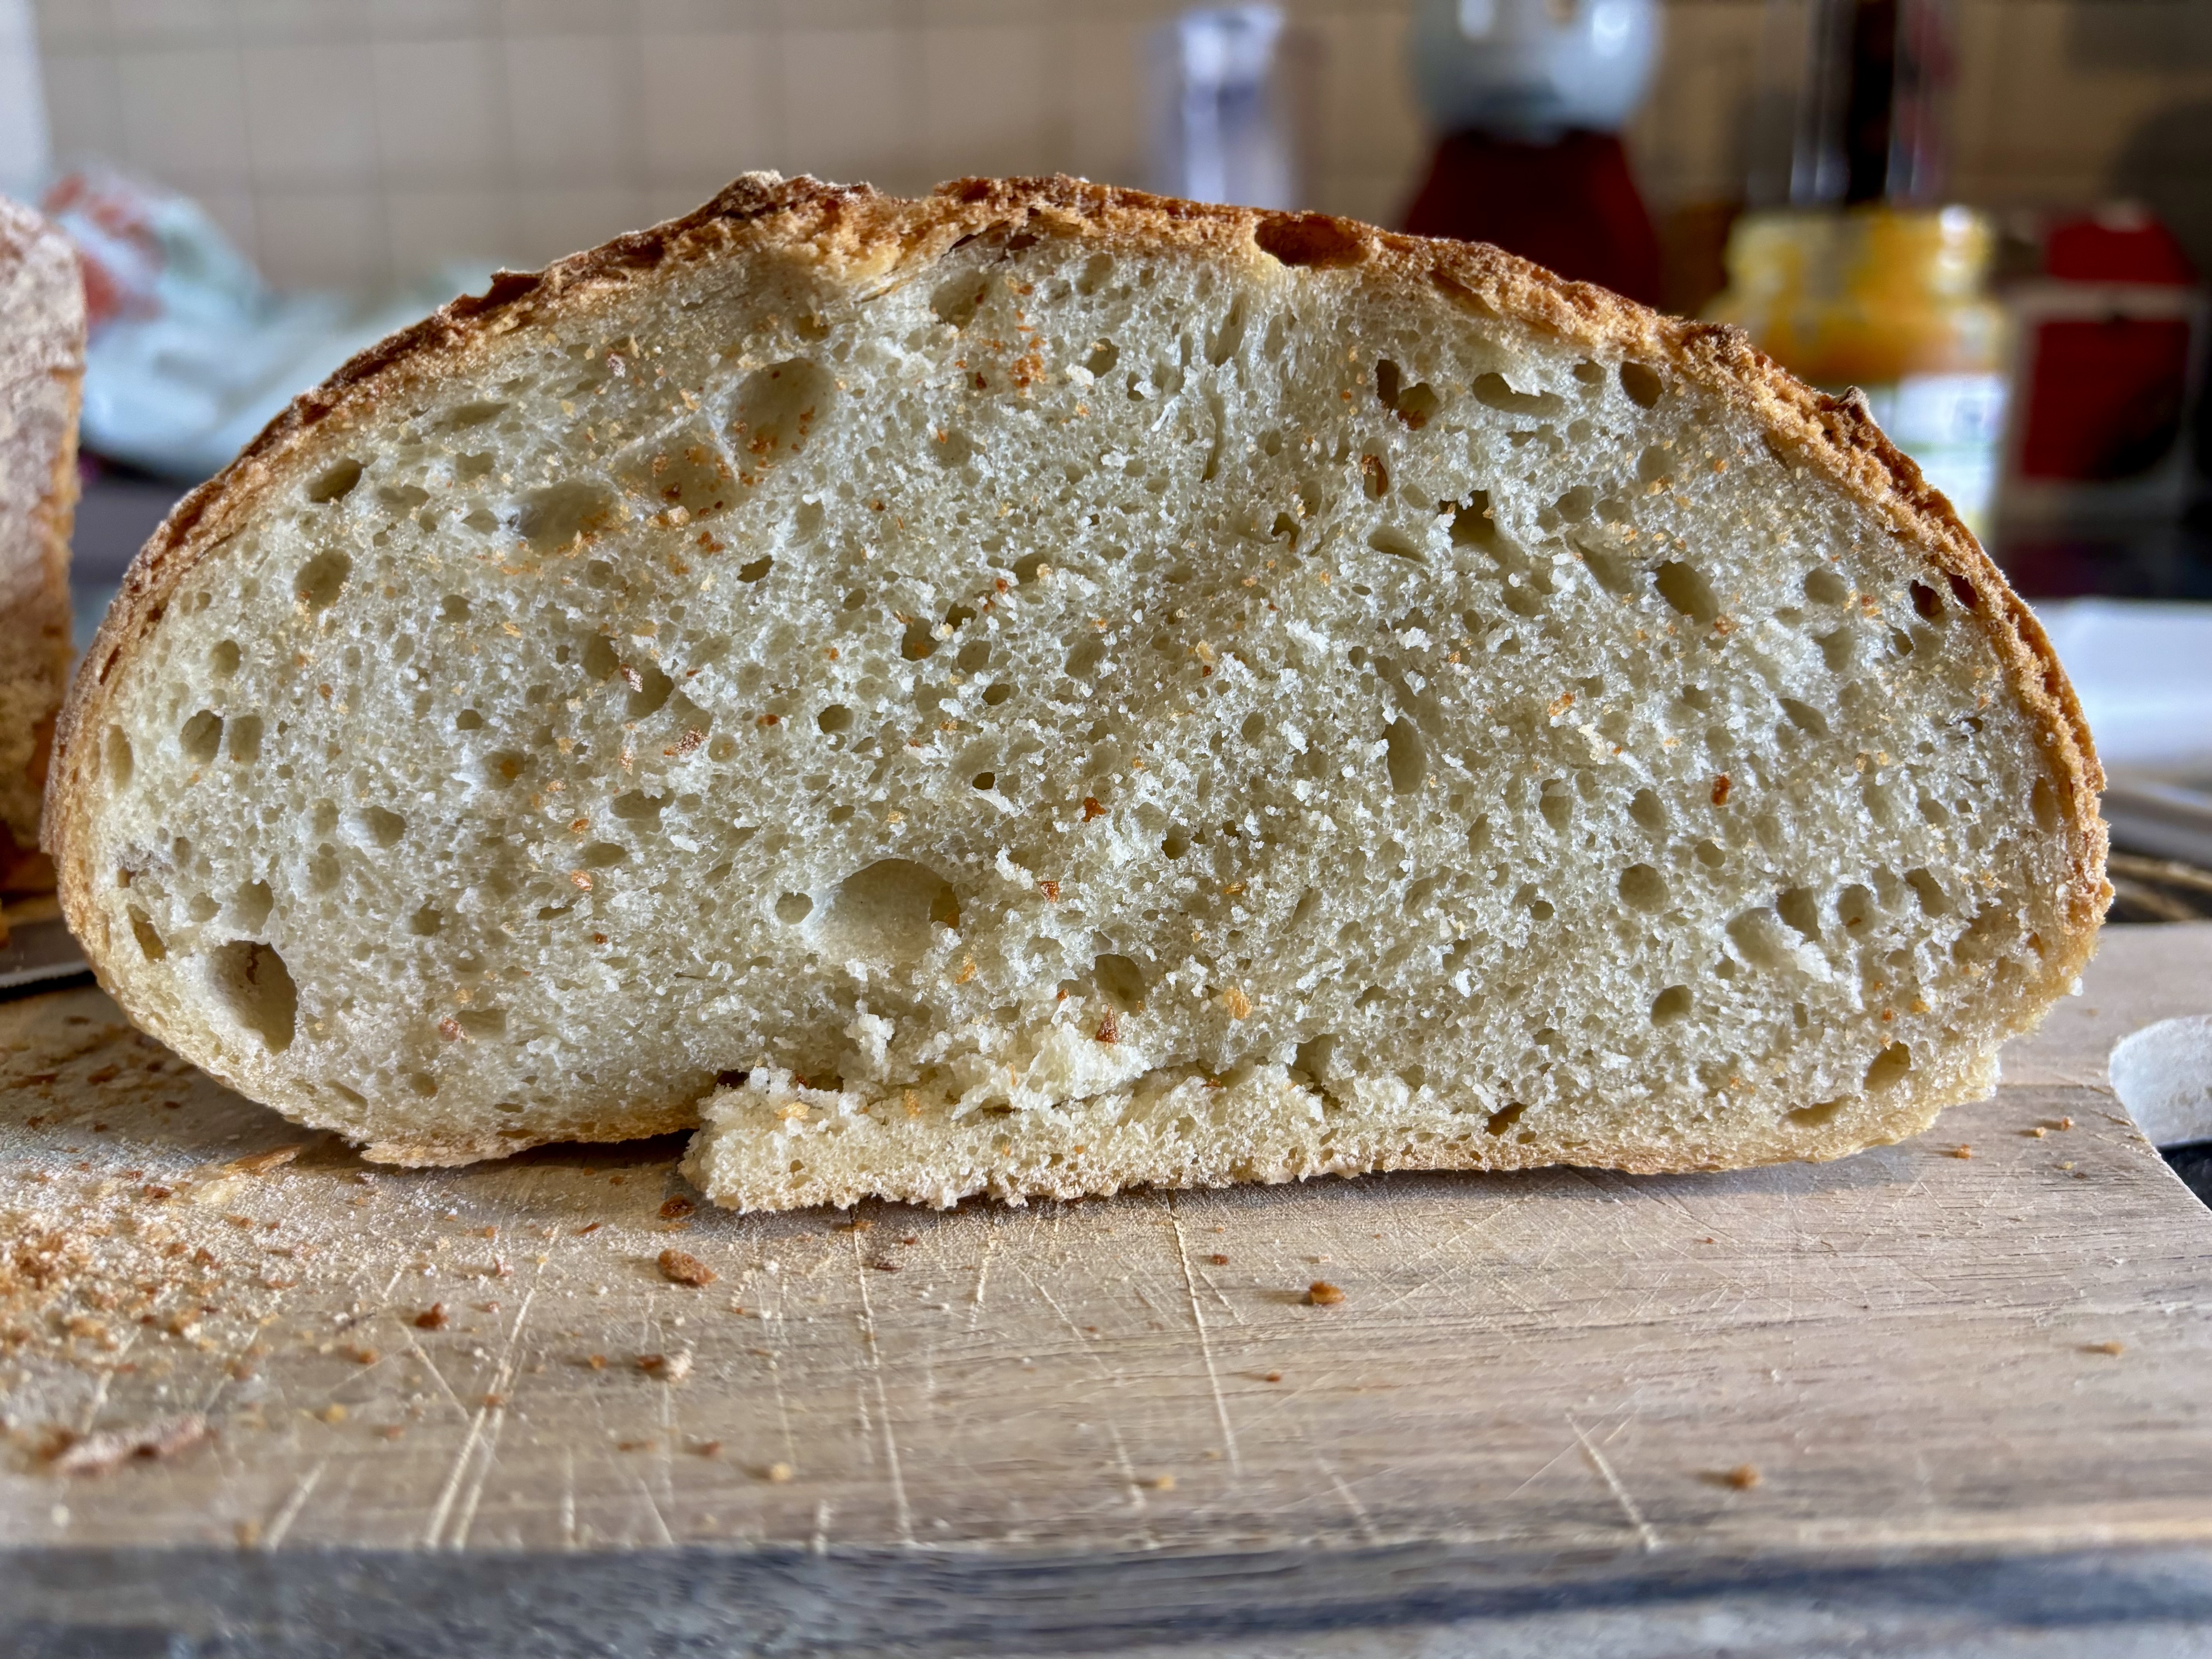
Internal texture of bread (e.g., open = large holes, tight = small holes). Tip: High hydration and long fermentation create an open crumb.
Crust
Outer layer; can be soft (e.g., sandwich bread) or crispy (e.g., baguette). Tip: Steam in the oven’s first 10 minutes for a crispy crust.
Dense Bread
Result of underproofing, over-kneading, or low yeast activity. Fix: Extend proofing time or check yeast freshness.
Folding/Stretch & Fold
Technique to strengthen dough: Wet hands, lift dough, stretch, and fold over itself. Repeat 2–3 times during bulk fermentation. Tip: Replace kneading for high-hydration doughs.
Gummy Crumb
Caused by underbaking or excessive moisture. Fix: Bake until internal temp reaches 96–99°C (205–210°F).
Hydration
Ratio of water to flour (e.g., 70% hydration = 70g water per 100g flour). Tip: Higher hydration = stickier dough, more open crumb.
Kneading
Developing gluten by working dough (10–15 minutes by hand or 5–8 minutes with a mixer). Tip: Stop when dough is smooth and passes the windowpane test.
Levain
Sourdough starter (flour + water, fermented with wild yeast/bacteria). Tip: Feed daily (1:1:1 ratio of starter:flour:water) for active levain.
Overproofed
Dough left too long, causing collapse or sour taste. Fix: Proof at cooler temps (e.g., fridge) to slow fermentation.
Oven Spring
Rapid rise in the oven’s first 10 minutes. Preheat oven to 230–260°C (450–500°F) and use steam for maximum spring.
Poolish
Wet pre-ferment (100% hydration, 0.1–0.3% yeast). Ferment 12–16 hours. Use for light, airy bread like brioche.
Proofing
Final rise after shaping (30 minutes–2 hours at room temp). Dough is ready when it springs back slowly to a gentle poke.
Scoring
Cutting dough before baking (0,6–1,3 inch deep) to control expansion. Use a razor or lame at a 45° angle.
Steam
Moisture added to the oven (e.g., spray bottle or tray of water). Steam for the first 10 minutes to prevent crust from setting too early.
Underproofed
Dough not risen enough, leading to dense texture. Fix: Extend proofing time or increase room temperature.
Windowpane Test
Stretch a small piece of dough thinly; if light passes through without tearing, gluten is well-developed. Use to check if dough is ready for bulk fermentation.
This will be my debut in a series I’ll be sharing with you. To explain what these “Kitchen projects” are all about… I love cooking, not just for the flavours or the joy of feeding others, but for what it truly is: a form of experimentation.
Cooking, to me, is more than following a recipe. It’s about the experience: the kind that comes from trial, error, and those unexpected moments of discovery. Sometimes, it’s not just about the ingredients or the steps; it’s about patience, skill, and the willingness to embrace the unknown. It’s where science meets art, and where every ingredient tells a story of its own. I’m excited to share this journey with you, where we’ll explore, create, and maybe even stumble upon something delicious together.
There are many recipes I would like to try, but one of the most beautiful and rewarding preparations there is, one that I have never been particularly skilled at but always wanted to, is bread-making.
Introduction to the experiment
In the past, I have already attempted making bread; I was particularly interested in making sourdough. I don’t know why I am so obsessed with it, but I guess the idea of getting your bread using one of the most natural and traditional processes deeply interests me, gives me a feeling of respecting the past, but also makes me think that I am doing something that is healthy for my family. To unpack this idea, many people nowadays eat bread that is not good for us. Not only do we eat bread that is industrially made, containing a lot of chemicals such as stabilizers and preservatives, but we have also completely removed nutrients from our flour. In the past, our bread was one of the biggest sources of daily calorie intake (especially in Europe), which was, at the same time, a source of nutrients. Nowadays, by removing the bran and germ, we create bread that is very easy to produce industrially, but, at the same time, we remove the most nutritious and flavourful part of it. What is even worse is that we do not give the flour enough time to ferment by using the industrial yeast. That means that even if the bread is made from a whole grain, it doesn’t have enough time to process all the “hard-to-digest stuff” that is in the flour.
To explain further, let’s look closer at the fermenting process of bread, using sourdough. During the sourdough fermentation, wild yeast and lactic acid bacteria (LAB) in the starter work together to break down the flour’s sugars, producing carbon dioxide for the rise and organic acids for flavour. This slow process not only creates sourdough’s signature tangy taste but also partially degrades gluten and starches, making the bread easier to digest, especially for those with gluten intolerance. Moreover, the fermentation also reduces phytic acid, which usually prevents mineral absorption, and also generates prebiotics that support gut health. This process is just impossible to achieve while using the industrial yeast, which raises a bread in an incredible 45 minutes, instead of a 24-hour slow fermentation in the fridge.
I’ve tried making sourdough bread a few times in the past, and while I’d love to master it, I have to admit that I’m simply not skilled enough… Yet! But that’s not stopping me! And with that thought, I am bringing the conversation back to where I started: the reason why I write about my kitchen experiments, in this case, yeast bread: to slowly build the skills and knowledge I need before tackling something far more complex – like sourdough!
And that leads me to my ultimate bread-making dream: creating the perfect sourdough wholegrain loaf.
The initial recipe
For now, though, let’s stick to the nice and easy. While I am creating my new sourdough starter from scratch, I will be working with yeast. This method will provide me with some basic knowledge about how to knead, shape, proof, and bake bread.
I started my experiment about a week ago when I dug up an old recipe from my culinary school. The recipe was for a basic Belgian yeast bread with relatively low hydration; however, that time I didn’t think about it very much, and I just wanted a reference that was given to me by a guest lecturer at my University. The recipe went as follows:
1. First, I had to make a poolish, which is a simple pre-ferment, using 100g flour, 100g water, and yeast. The recipe called for 10g of fresh yeast, which I didn’t have in my kitchen, so I used dry yeast instead. For the whole recipe, I utilised a whole package of 4,5g, but in the initial poolish I only added approximately half of that package (meaning about 2,25g of yeast). Then this mass had to be left resting for 1h.
2. Meanwhile, I weighed 400g of flour, the recipe called for +/-175 g water, 11g salt, and 30 g fat (I decided to use olive oil). After 1h had passed, I combined all the ingredients, including the poolish, in a KitchenAid. The dough was quite tough and didn’t want to combine well, so I took it and kneaded it in hand for about 3-5 minutes. If my calculations are correct, then we are talking about +/-55% hydration here. After the dough was supposed to rest for at least 20 minutes at room temperature, covered in plastic foil.
3. Then the instructions called for a series of stretches and folds, the first one was in a way that the envelope is folded, and then rested for another 20 minutes. In general, it was a little bit hard to work with this dough because it was really stiff; I concluded it was because of the hydration %. The next step was to divide the dough into 2 equal parts and shape each into a tight ball while letting it rest for another 10 minutes. This was a little bit strange to me because the dough was really small after the dividing, but I didn’t want to question this recipe before I tried it.
4. After the last resting time, I had to execute the final shaping by flattening the dough with my hands and then shaping it into a batard (long loaf), and finally proofing it for around 30-45 minutes while resting it covered on an oil-coated baking tray.
5. Next step was to preheat the oven to 240 degrees Celsius and bake it at this temperature with steam for the first 10 minutes. Of course, don’t forget to score it before putting it in the oven! Then lower the temperature to 200 degrees and bake it for another 25-30 minutes. I believe I baked it for a little more than the instructions because it was simply not enough colour on top for me.
6. After the bread is baked, it needs to rest for at least 1h before it can be cut! This is a very important step because the bread is still baking when you take it out of the oven.
In case the ingredients are not as obvious here I provide a summary of the recipe:
Poolish +/- 200g (Flour 100g , Water 100g, Yeast 10g fresh or 2,25g dried)
Water 175g
Flour 400g
Fat 30g (in my case olive oil)
Salt 11g
This recipe, in my opinion, has a few gaps that I didn’t notice the first time I baked it. However, through my process of discovery, you’ll be able to follow my comments and insights about it.
Comments on the original recipe
My first attempt resulted in relatively good bread. Unfortunately, I don’t have pictures of these two small babies, but I can surely describe them.
Firstly, I think I didn’t score one of the breads properly because it kinda exploded from the bottom, the other one opened quite beautifully though. My next observation was that while the bread grew big and strong, the size was a little bit hilarious, and so I deduced that the next trial will not be divided into two. Furthermore, after I cut the bread in half, I noticed a small line of compact dough at the bottom; it wasn’t very pronounced, but if one looked closer, it was obvious; the bread needed more time in the oven. For the crust, I think I have to figure out a better way to create steam in the oven because it wasn’t very shiny, and that also can be a reason that one of them teared at the bottom – the dough didn’t have enough steam at the beginning to create the shiny crust and allow the dough to expand without tearing. Lastly, the crumb was quite dense. I feel the dough fermented well, and there were lots of very tiny bubbles. It also felt quite fluffy, but I fear that the hydration % and lack of steam made it more of a dense bread. In general, for my first try, I think the bread was more or less a success; it just needed a few tweaks and a bit of love.
After this, it was obvious what I wanted to do. I had so much free time in my life at this point that a hydration experiment would be a great way to learn something new and fill my free time with something productive.
On bread
Before we dive into the experiment, it’s important to define what makes a good bread—for me. I emphasize “for me” because everyone has their own preferences and ideas about what constitutes the perfect loaf. Whether it’s texture, crust, flavour, or something else entirely, those personal criteria will shape how we approach this process.
Harold McGee, in his book On Food and Cooking, discusses the qualities of good bread. While he doesn’t provide a single, concise definition, his insights can be summarised and cited as follows:
“The keys to a chewy and soft bread interior are a high-protein all-purpose or bread flour and a wet dough. This combination fosters the development of gluten and the formation of irregular air pockets, contributing to a desirable texture. Additionally, the crust should be crisp, and the flavour complex, reflecting the fermentation process and the quality of the ingredients. Bread is a food of remarkable diversity, and its goodness is ultimately shaped by personal and cultural preferences.”
– Harold McGee, On Food and Cooking: The Science and Lore of the Kitchen
For what’s the matter I agree with this definition. To truly appreciate it, though, let’s explore it further and bring it to life with some vivid examples and visuals. Lots of the parameters, as you will probably notice come from the text McGhee wrote in his book, however I will add few more items to the list, to specify further.
Parameters
Explanation
Related variable
Chewy
Dense, elastic texture that requires more effort to bite and chew, often prized in bagels or sourdough. Balanced with soft.
High protein flour, long fermentation, gluten development
Soft
Tender, easy-to-bite texture. Balanced with chewy texture.
High hydration, fat (butter/oil), tenderizers (e.g., milk, eggs)
Irregular air pockets
Open, uneven crumb structure, desirable in artisanal or sourdough for texture and visual appeal.
High hydration dough, long fermentation, sourdough starter, gentle handling, Autolyse, Baking technique
Shiny dark crisp crust
Glossy, deeply caramelized crust with a satisfying crunch, typical of well-baked bread.
High oven temperature, steam in early baking, flour type
Complex flavour
Rich, layered taste with notes of tanginess, sweetness, or nuttiness, often from fermentation.
Long fermentation, sourdough starter, autolyse
Open crumb
Large, connected air pockets in the interior, ideal for absorbing sauces or spreads.
High hydration, long fermentation, gentle handling, strong gluten
Uniform crumb
Even, fine texture throughout.
Consistent mixing, controlled proofing, even baking, proper shaping
Table 1: What defines a good bread
If you area until this point unaware of any vocabulary or process of bread making, I have made a short page where you can get to know more about it, here.
Experimenting with bread hydration %
A few days after my first attempt at bread making, I tried baking again. This time, I decided not to divide the dough into two loaves but to bake it as one larger loaf. I’m especially focused on mastering the basic techniques of bread making and achieving a nice, well-structured crumb with big irregular air pockets.
Each time I go through the process, I notice a few imperfections, which I aim to address in the next batch. In general, I’ve been following the same recipe, but I adjusted the amount of one ingredient – water – to see how it affects the texture and crumb. I’m eager to refine my approach and learn from each bake!
60% hydration
I was very excited to change the amount of water from 175 to 200, especially because I found the dough too thick to manipulate. As soon as I started kneading, though, I noticed that the dough was much stickier, and I had a little bit of a hard time with the kneading. I know that this is still supposed to be relatively easy dough to manipulate, but my lack of experience was at play. I fixed it with just a tiny splash of flour and I was ready to knead the s**t out of it.
I went through the folding process, which was just so much better compared to the 55% hydration. I find it crazy that such a small amount of water made such a difference. The dough was going through the very same process as the one before, with not one change, including the kneading, stretching and folding, and shaping and final shaping… the scouting was extremely easy and successful.
For baking, however, I tried to add much more water to create the initial trail. I just went for it and added a big glass of water to the surfaces of the heated oven. The baking went perfectly, just look at the beauty that came out of it! I was so proud of the scoring and the crust and the overall look of the bread! The only thing was that I felt that the crust still lacked some of that fresh-looking shininess.
60% – right after baking
After I cut the bread in half, I saw that the crumb was much improved; however, not as I expected at all. For reference, see the picture below, and please don’t mind my extremely bad cutting skills. I don’t know, was it me or the knife?
Crumb – 60% hydration
When thinking about it, I was not sure why the crumb was still so dense. Don’t get me wrong, the bread was super soft and fluffy, and I felt that the bubble distribution was quite good too. It’s just I imagined that it would have much more… huge bubbles, and everywhere!? This made me think that there are 3 possibilities of why I lack these huge bubbles. It is earthier the fact that I use industrial yeast, or it is a lack of fermentation, or it is the hydration %? Or is it possible that it is caused by all these or none at all? I think the only way to know is to go ahead and experiment further, starting by increasing the hydration percentage by 10%.
70% hydration
After the bread was eaten, I decided to bake once again. I was truly not mentally ready for this batch. I thought that kneading the last bread was hard, but this one was just impossible to manipulate. Once again, I combined my ingredients in a KitchenAid, but I was very much aware that I would not be able to knead the bread by hand.
Freshly mixed doughAfter 2nd stretch and fold
Even though I watched multiple videos on YouTube about how to manipulate a wet sticky dough, I was not able to master it. My first try to stretch and fold was a disaster. I am pretty sure you are not supposed to and also not able to perform the same type of folds as with the 60 or 70 percent hydration. That’s why I was just trying to stretch and fold with wet hands, just as you would manipulate a focaccia. The next set of folds I tried to make more structure by using a bread spatula – which, in my case, was more of a patisserie scapula, but that’s all I had. Using one flat side of the spatula, I was moving the dough on the counter in a circular way, trying to make a smooth ball. I covered it with plastic foil between the folds, and figured out just a few minutes later that it got completely stuck to the foil and that I ruined it yet again. That’s when I decided to use the flour on top to prevent the sticking. After using the flour, it was easier to pre-shape it, but I still had the sticking problem. Please, tell me, what did I do wrong? I thought the dough was not supposed to stick after it had a smooth surface. Was it me, or maybe my counter that is particularly sticky? Anyways after a hard work, I was finally able to finalize it.
Final-shaping
Now the only thing missing was to score it and throw this piece of hard work to oven. What else can go wrong, right? Of course, in the very last moments I managed to completely f*ck-up the scoring. You cannot imagine my frustration after my extremely sharp knife got stuck in the dough while cutting. Honestly, at that point, I thought I ruined the whole bread. Anyways, I dropped it in the oven, added some water for steam, and baked it as usual.
70% – right after baking
Honestly, I was pretty surprised after I took it from the oven. Obviously, you can see that the scoring was a disaster, but the bread looked shiny with a dark crusty crust. The only thing that I was really not proud of was that I didn’t oil the tray, so the bread completely stuck to the bottom, and on one page, there was a slight, tiny, tiny tear because of it. As a bread just wanted to grow and rise, but it just couldn’t since it was stuck to the tray completely, and so it broke.
Of course, I was eager to cut the bread in half. So when my alarm indicated 1h after baking, I ran to the counter and sliced right through it with excitement. I was so exited form he results. The crumb was much more ‘alive’ compared to the one of 60%. The bubbles were big and small, beautifully spread throughout the whole bread! Just look at it! But again, please don’t judge my cutting skills.
Crumb – 70% hydration
This whole experience got me thinking that, if I increase the hydration next time, the bread won’t just hold its shape during the final proofing. I think I will need to find an alternative to a proofing basket…. And add oil to the baking tray, of course.
80% hydration
I would like to say that the 80% hydration bread totally met my expectations for the crumb, but I would be lying. I started with 1h autolyse to help develop the gluten. That time I had no idea how unsuccessful this will be. Honestly, not just the result, but the whole process of preparing this bread was a huge disaster, and I must tell you that i lost it more than once during this batch.
Mixing and first fold
Already, the mixing process was a big pain in the ass, because of the extremely sticky dough. The kneading and stretch and folding process was very painful as well, having almost no experience working with such high-hydration bread. The worst part is that, being a perfectionist, I might have ruined my bread during this process by trying to make it perfect. Of course, I worked mostly using water and didn’t really want to use any additional flour, but that was really not possible in this case. After a lot of struggle, I finally managed to somehow shape the bread. I concluded, that there is no way that I will be able to final-proof this bread without a proofing basket, which I didn’t have. So I created one using a nice bowl and a cloth with flour to prevent sticking.
80% hydration proofing
I am quite sure, though, that The final-proofing didn’t go as planned because after I put it out of my ‘proofing basket’, it didn’t hold shape very well. The result was a flat piece of dough that I was sure was not going to rise according to my expectations, and it worsened even more after the scoring. I guess I didn’t do a very good job developing the gluten. Anyways, I scored it, and started the baking process.
Scored 80% hydration bread
As I predicted, the baking didn’t go according to my expectations. The crust was not quite it and the bread didn’t rise very well in the oven, as you can see in the picture below. There were some minor breads of the burst at the bottom of the bread, and the scoring didn’t open the bread to my imagination.
80% hydration crust80% hydration bread
The crumb was also not according to my expectations. I would imagine that the bubbles would be much bigger and spread all over the bread. It just felt dense compared to what I imagined.
80% hydration crumb
Conclusions
So here we are, at the end of this first chapter of my Kitchen Projects—a series that’s as much about the bread as it is about the stumbles, the questions, and the quiet victories along the way. I started this journey because cooking, for me, has never been just about the end result. It’s about the process: the way flour transforms under my hands, the way yeast whispers secrets to the dough, and the way every loaf carries the weight of both tradition and my own stubborn curiosity.
This experiment with yeast bread was my way of building a foundation. I wanted to understand the basics (kneading, shaping, proofing) before I dared to tackle the beast that is sourdough. And oh, what a humbling struggle it promises to be. But that’s the point, isn’t it? To embrace the unknown, to let the dough teach me patience, and to accept that failure isn’t just possible: it’s inevitable, and it’s necessary.
Each loaf, from the dense 55% hydration to the rebellious 80%, told me something new. The 60% hydration bread, with its improved crumb but still-timid bubbles, made me question whether I was rushing the fermentation. The 70% loaf, with its lively crumb and disastrous scoring, reminded me that even the ugliest loaves can hide the most beautiful surprises inside. And the 80%? Well, it taught me that sometimes, the dough (and life) won’t conform to my expectations, no matter how much I will it to.
I’m not there yet. My dream of the perfect sourdough wholegrain loaf still feels like a distant horizon. But I’m closer than I was 2 weeks ago, and that’s what matters. Because this isn’t just about bread. It’s about showing up, trying again, and finding joy in the messy, imperfect process of learning.
So here’s to the next loaf—the next experiment, the next lesson, and the next delicious mistake. I can’t wait to share it with you.
What about you? Have you ever tackled a kitchen project that felt just out of reach? I’d love to hear your stories; your triumphs, your disasters, and everything in between.
Bulgur is a whole grain made from cracked wheat berries (usually durum wheat) that have been parboiled, dried, and then ground into various sizes. It’s a staple in Middle Eastern, Mediterranean, and Turkish cuisines, prized for its nutty flavour, quickcookingtime, and nutritionalbenefits. Unlike freekeh or couscous, bulgur is pre-cooked, so it doesn’t need much preparation time, making it a convenient and versatile ingredient. Rich in fiber, protein, and essential minerals like magnesium and iron, bulgur is often used in salads, pilaf, soups, and even as a meat substitute in vegetarian dishes. Its chewy texture and mild taste make it a popular choice for both hearty and light meals.
Here you can find the nutritional values of bulgur and its comparison to rice, and pasta:
Source: THE SCIENTIFIC AND TECHNOLOGICAL RESEARCH COUNCIL OF TURKEY
The ingredients
For this recipe, you only need the most basic hints you can find in your kitchen:
1 part Bulgur – you can choose any size of bulgur, the preparation will be the same.
2 parts Water/ or a VegetableStock– you can use plain water, but I personally find it more satisfying and tastier with broth.
Bouillon – if you do not have a vegetable stock at home, you can use a store-bought bouillon which normally comes as a cube. For 1 cup of bulgur, I normally use half a bouillon cube however, this is not a very precise way to measure. If you are unsure you can just follow the instructions on the package of your product.
1-2 tbl of Olive Oil – this is not really necessary, but I find it tastier with the addition of a good quality olive oil.
Pinch of Salt – add salt to your preference, but bear in mind that maybe you already added salt to your stock, or that there can be salt in the bouillon you are using.
The preparation technique
Now, for the preparation… Bulgur is probably one of the easiest grains to prepare, and that’s because it was already cooked for you. For what it matters, you could simply add some hot water or broth, let it soak for a few minutes, and your meal will be ready. I, however, have a preferred technique.
1. You can simply add all the ingredients in a pot of suitable size – first the bulgur, then water, and the rest. Bring it all to a boil and cook for about 10 minutes on medium-high heat, while occasionally stirring.
2. After turn off the heat, cover your pot and let it sit there for 10 more minutes. Do not take it away from the source of heat, and don’t mix or open it!
3. After the time’s up, check the bottom of the pot by stirring the bulgur with a spatula. The bulgur is ready if there is no residual water at the bottom, it looks somewhat dry, and it feels soft in the mouth. This is 99.99% percent times of the outcome.
Bulgur just after cooking.
4. [optional] Personally, I like to still turn on the heat after the cooking is done, and fry the bulgur slightly, using the same pot. Just make sure you stir it continuously. This leaves a little bit of a nutty flavour and a crunchy and dry texture to it. You don’t need to add any extra oil since you have some residual oil in the bulgur already.
Note: If there is a lot of water after coking, then you simply added more than 2 parts of water. Just let it sit for a little bit more, or just turn on the heat for a while and let the water evaporate while stirring continuously. If there is a bit of water left – meaning that the bulgur feels a little bit too wet but there is no residual water at the bottom – just keep the lid open and let the water naturally evaporate while you are doing some other preparations, or execute step 4.
Although goulash originated in Hungary where it is celebrated as its national dish, it also holds a cherished place in Slovak cuisine, reflecting the shared history and culinary traditions between these two nations. Many Slovaks relish goulash prepared both in home kitchens and restaurants, with each family often having its own unique recipe that showcases personal preferences and regional ingredients. In my opinion, the finest and most gratifying method of preparation involves cooking it outdoors over an open fire using a cauldron. For us Slovaks, goulash is more than just a delightful dish; it serves as a heartwarming social event, providing an opportunity to spend quality time with friends or family, where laughter and storytelling abound around the bubbling cauldron. This experience is a must for anyone seeking to immerse themselves in authentic Slovak culture. Traditionally, preparing goulash is an all-day affair, often taking at least five hours of cooking time, and it typically involves a fair amount of drinking as part of the process.
Ingredients 🛒
The ingredients for this dish may vary, especially when speaking about the types of meat. To start with, the best way to determine the ratio of meat and onions is to always measure it in volume. This can be explained by looking at a cut of meat and comparing it to onions cut into 0.5 cm cubes, where visualizing the portions becomes essential in mastering the technique. If you feel the amount is the same in volume as the meat that you are using, then you have it correct! Normally, the amount of ingredients is not so difficult; I prefer to cook with feeling instead of weight, especially for such traditional preparation that relies heavily on the cook’s intuition and experience. The process becomes an art form when one allows the senses to dictate the measurements rather than strict numbers. Obviously, the amount of ingredients depends on the amount of goulash that will be cooked, which can vary greatly depending on the occasion and the number of guests you intend to serve. There are many sizes of cauldrons; however, the content of this post was written using a 12-liter cauldron, making it an excellent reference point for larger gatherings. I believe it will be easy for you to convert to any size of pot or cauldron you will be using by applying the same principles. You can scale up or down while maintaining the essence of the dish. But without further ado, here I suggest this combination for the most optimal flavour.
The list ☑
Pork belly (optional)
Beef neck
Onions
Pork fat (or duck fat)
Tomato paste / Concentrated tomato puree
Sweet paprika powder
Chilli powder / Hot paprika powder (optional)
Black Pepper
Garlic
Yellow, red and orange peppers
Peeled tomatoes (canned or homemade)
Goulash seasoning (optional)
Potatoes
Marjoram
Plum Jam
Preparation technique 👩🍳
1. Caramelise onions in pork fat.
This is the MOST important step of this preparation since the onions create a very distinct flavour as well as thicken the soup. The caramelisation needs to happen slowly, over very low heat; otherwise, the onions will burn. This will take a total of 75-100 minutes! Yes, it sounds hard. I can confirm from my past experiences that it is. Just a very small increase in temperature may burn the onions, creating unwanted flavour and texture in the soup. This is particularly the case while cooking on fire, where the temperature is rather unstable and may rise almost unpredictably.
By stirring actively and guarding the fire during the process you should go through this step without burning anything. I suggest seeking the help of someone more experienced. If that is not an option, my advice would be not to add a lot of wood at the same time and to ensure you have a strong and stable fire base before cooking; maybe even consider using coal instead of wood. It is also important to note that a strong fire can burn your cauldron, obviously depending on the type that you are using.
Furthermore, to finish this step, I recommend using an amount of pork fat that will almost completely cover your onions. If you don’t have pork fat (or you cannot use it due to religious reasons), using duck fat is also a good option. Normally, you can buy both at a butcher shop or just save some duck fat from your last preparation of duck breasts; trust me, there is enough in those. For reference, I provide a few pictures to better illustrate the process and the result of it.
2. In the next step, we will add concentrated tomato puree.
During my preparation, I used just one small can of tomato purée, typically found in supermarkets across Europe. If you’re making more goulash than I did, consider using 2 or 2 and a half cans; vice versa, if you’re making less, use a smaller quantity. After adding the purée to the pot, mix it with the onions for a while until the fat doesn’t separate. If you’ve ever prepared curry and fried it before adding other ingredients, this step might already be familiar to you. Frying it slightly is essential because “raw” concentrated tomato can introduce unpleasant sourness; however, burning it will make it bitter, which we want to avoid. I can assure you that by staying close to the pot and stirring properly, you can easily execute this step without any harm done.
3. Addition of red paprika. Do not burn it!
At the end of this process, we can add about 2-3 spoons of sweet red paprika. Traditionally, the best choice would be Hungarian paprika, but any good-quality paprika will do well. Using smoked paprika is also an option, but for the optimisation of taste, I wouldn’t recommend it, or at least mix it with some sweet paprika in a ratio of 1:3, respectively. We stir this for a very short time, just enough to incorporate it, because paprika powder tends to burn quickly.
4. Let’s cook some beef.
By adding beef cut into 4 cm squares, we will cool down the contents of our cauldron and thus prevent the paprika from burning. While occasionally stirring (still on low heat), we will wait until the meat changes color on each side. After this process is done, we can add water to just cover the meat. It is important to NOT boil the soup. The best would be to not bring it to a boil at all, but if that happens, just keep it gentle. Since we will cook it for some time, we don’t want the meat to become dry. The best way for meat (especially the ones with lots of connective tissue and fat) is to cook it slowly and lengthily.
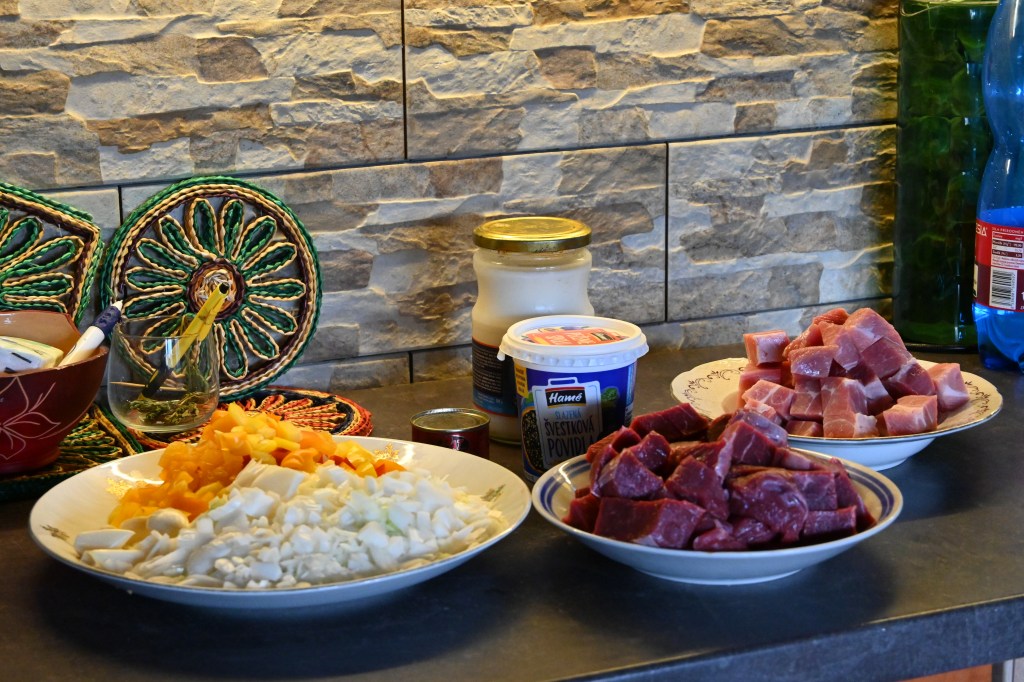
For this recipe, I used some pork as well, and you can or don’t have to do that. The addition of pork meat adds a lot of fat and flavour to this dish, but in the next step, I will explain another way of getting the flavour in while using the meat in another simple dish later. If you are wondering about how much meat to add you can look at this picture for reference.
5. Making our own cooked bacon you say?
If you do not want to add more meat into your soup but you would love to have a distinct, rich flavour in your goulash, you can boil a full piece of pork belly in it. This method not only enhances the soup’s taste but also infuses it with a delicious, hearty essence that pairs beautifully with the other ingredients. You simply add the whole piece of pork belly into the soup right after you add the water, ensuring that it is submerged for optimal flavour extraction and even cooking. You cook it until the beef cubes are tender and fully cooked as well, which typically takes approximately 2-3 hours depending on the temperature of your preparation. During this time, the pork belly will release its fats and juices, contributing to a thick, aromatic broth that is undeniably comforting.
After the belly is cooked, you take it out and let it cool down completely. Meanwhile, you can prepare a flavourful mix of oil, minced garlic, salt, red sweet paprika (or smoked paprika), and chili if you want to add some spiciness to your dish. After you rub a thick layer of the mixture thoroughly on the belly, ensuring all surfaces are well coated, cover it with some aluminum foil to lock in the flavours. You can store it in your fridge overnight, allowing the spices to penetrate deep into the meat. The next day you can enjoy an explosion of flavours with your homemade bacon, ready to serve with other dishes of simply as a snack with bread and some mustard.
6. Adding our aromatics and spices!
Coming back to our soup, after we added the water we can add our veggies and the seasoning. First, we will prepare some peppers cut into small stripes; you can use any peppers. Obviously, the best would be to have some home-grown ones; however, if that is not an option, I recommend using different colors for more complex flavors and interesting color in the soup. We then add some canned peeled tomatoes. For a 12-liter cauldron, 1 bigger can will be enough. With this ingredient, you can of course use normal tomatoes as well; it would be better if they are well-ripened, and you have to peel them in water beforehand to remove the skins; otherwise, they will be quite annoying in the final dish. 3-4 bigger tomatoes will do just well. Additionally, we can throw about 3-4 cloves of garlic – peeled and smashed with the side of a knife.
Spices will be added afterwards: about 1 smaller spoon of black pepper, chili powder according to taste, and some additional red paprika if necessary. For a more optimal flavor in countries like Slovakia, Poland, or Hungary, you can find goulash seasoning in supermarkets. This is quite a common way to add this very specific flavour to your goulash. To have a better understanding of what I am talking about, look at this link. If you have it, use it; if not, that is okay as well. Of course, add the salt in this step as well!
7. Method for thickening the soup naturally.
After our goulash is cooked to the point that the meat is tender, we can start adjusting its quantity to achieve the perfect consistency. If you feel the soup lacks some juices or seems a bit dry, you can add some water to enhance its texture and bring back the moisture. On the other hand, if you find that the goulash is too liquid, you have the option to thicken it; or, of course, you can do both depending on your preference.
After you add water or if you simply think it is too thin, you can grind one or two potatoes straight into the soup. This will naturally thicken the goulash as the potatoes break down and release their starches, creating a velvety texture that enhances the overall flavour. Bear in mind that goulash should be quite thick rather than liquid, resembling stew rather than soup. Allow it to simmer for a few extra minutes, and you’ll find that this method not only thickens the soup but also adds a subtle creaminess. This is a great way to naturally thicken the soup while also elevating its taste.
8. Boiling potatoes 20-25 minutes before finish
Depending on the size of the potatoes we can add them in about 20-25 minutes before we are ready to serve the soup. This is very easy step and you have plenty of time to prepare the potatoes. you can just peel, cut them in squares and store them in a water unit they are ready to boil.
9. The finishing steps – marjoram and plum jam will make the difference.
Finally, you have some to the end of this recipe. After you cut the source of heat of the soup you can add a spoon or two of the plum jam into the this delicious mix according to your taste. You mix throughly to ensure its dissolution. This is a very traditional ingredients especially in the south of Slovakia, adding very specific sweet and cooked flavours to goulash. in the other parts it is not as common, so if you cannot find this ingredient just skip it without worrying your mind.
The last step will be to add 1 to 3 spoons of dried marjoram. It is not quite common herb to sell in many countries. you might find it in some polish stores for example. If you cannot find this you can search for an oregano which is the same family but has little stronger flavour. It is importune not to cook the goulash much after you add the oregano anymore. Some people believe that after storing goulash with marjoram it becomes more acidic overnight, and they suggest to put it in just before serving in your own plate, according to taste.